Find your natural part by towel-drying your damp hair and using a wide-toothed comb to discover where it falls naturally. Don't worry if it's not initially flattering – adjustments can be made. If you've been facing hair challenges like localized breakage, lack of volume, or unruly strands, it might be a sign to retrain your hair part.
Invest in a quality comb, like a wide-tooth comb and a pin tail comb, to perfect your parting. “No-Mark” clips are also essential for maintaining your part line during styling. Embrace the blow dryer technique to direct each section away from your part line for a polished look. And don't forget your night routine – keep your part in place by securing it with braids, pin curls, or no-mark clips and a silk sleeping cap
Training your part may take a bit of time and effort, but the results are worth it. Switch things up for inspiring new looks, healthier hair, and that fresh, brand-new feeling. Join us on this journey of transformation and self-expression!
.
]]>
As a hairstylist, it’s always an honour to be part of someone’s wedding. I want every bride-to-be who sits in my chair to leave with hair that she’ll love as much when she walks down the aisle as when she looks back at the photos in the decades to come.
A consultation is crucial to helping you find your “I do” hairdo and working out all the kinks before the wedding bells toll.
Here are our tips on what to expect at your appointment and how to make the most of your time with your stylist.
]]>A consultation is crucial to helping you find your “I do” hairdo and working out all the kinks before the wedding bells toll.
Here are our tips on what to expect at your appointment and how to make the most of your time with your stylist.
Book your consultation at least a few months before big day
You don’t want to risk cutting it close when it comes to your hair on your wedding day, so we’d recommend scheduling your consultation sooner rather than later.
Booking a consultation about six months in advance of your wedding will give you and your stylist plenty of time to find your ideal look and make adjustments as needed.
Set aside about an hour for the appointment to give your stylist a chance to get to know you and your wedding vibe, test out a few looks and figure out a timeline for your hair trial, trim and color.
Come with inspiration, pictures and an open mind
Whether you have your heart set on a particular style or your Pinterest board is a tangle of different looks, your stylist is going to help you find your happily-ever-after hairstyle – and it may be more stunning than you even imagined.
They say a picture is worth a thousand words, and that’s especially true when it comes to hair. From magazine clippings of celebrities to your cousin’s best friend’s Instagram post, bringing images of hair inspiration is the best way to communicate your vision to your stylist.
But just because you adore another bride’s style doesn’t always mean it will always suit you. Your consultation will give you and your stylist a chance to see whether the style you have in mind looks as good in the mirror.
Even if it takes some trial and error, rest assured that there’s a head-turning hairstyle out there for you. Your stylist might be able to tweak a style to flatter your best features or suggest a gorgeous look you hadn’t even considered.
The more your stylist knows, the better
Finding the right bridal hairstyle relies on a precise alchemy. Any number of elements – from the humidity in the air, to the height of your heels – can throw this delicate balance out of whack, so it’s best to equip your stylist with as much information as possible.
Your wedding date, venue and theme will set the stage for any hairstyle you choose, so make sure your stylist has all the details about what you have planned for your big day. Season and setting, in particular, have an outsized impact on how long your look will last – some updos may not be able to take the heat of a summer outdoor wedding, while beachy waves may fall limp in the dead of winter.
Your hair is the crowning glory of your bridal ensemble, so share as much as you can about your dress, veil, shoes, makeup and jewellery to ensure your locks align with your overall look.
Another consideration that might come up in your consultation is height, both yours and your partner’s. As much as we love a short king, some men feel strongly about standing tall next to their bride (just ask Princess Diana). An elevated updo, plus a few inches in footwear, can take a bride over the top, so if height is important to you, be sure to get your groom’s actual measurements – not just the number he tells people.
Let’s talk texture
There’s one question that can often determine whether a hairstyle will work for you: What kind of hair are we working with?
Beautiful hair comes in all sorts of strands, and some styles are more suited to certain hair types than others. As a general rule, the greater the leap you’re trying to make from your natural texture, the more likely it is that your hairstyle will change as time wears on.
For example, straight-haired babes may find that their gentle waves fall flat fast, while coily-haired bombshells may see their blown-out curls spring back to form.
Come to your consultation with unstyled hair so your stylist can assess your natural texture and help you pick a style that plays up the gifts momma gave you.
Remember: it’s your stylist’s job to make you feel like the knockout you are on your wedding day. So between their expertise and your natural assets, you’re going to find that once-in-lifetime look.
Sweet wishes,
xo Morgan
]]>
Exquisite hair accessories, intricate braids and retro coifs are some of the chic, customizable looks that are turning heads this season. Here are a few of the hairstyles we're swooning for this spring with tips on how to put your own touch on the latest trends.
The half-up, half-down hairdo
If you're wavering between an elaborate updo and letting your hair down, this versatile hairstyle offers the perfect compromise and limitless possibilities to play with textures, volume and accessories.
Half-up, half-down hair works for most lengths and textures, showing off your luscious locks while keeping them away from that gorgeous face.
Whatever your bride vibe, there's a version of this style for you.
If you're going for fairytale romance, turn up the volume on your crowning glory with cascading curls adorned by our dazzling Classic CZ Pin Set. Or for more vintage vibes, tie together a bountiful bouffant with our Emerald-Cut CZ Duo.
The braided blowout
We're obsessed with this modern twist on the classic blowout.
Whether you're weaving your hair into an enchanting three-stand tiara or taking things up a notch with a Dutch braid, this look is giving playful polish.
For a little extra glamor, we'd suggest sprinkling our Perfect Pearl Swirl Set into your knotted coif.
Loose and easy looks
You don't need to make a big production to have knockout hair at your wedding.
We love to see brides embracing their natural texture for comfortable, confident beauty on their big day.
Another low-fuss option is to keep it breezy with beachy waves that channel your inner cool girl.
You can still make a statement with a simple style by topping things off with our Emerald-Cut CZ Headband.
Vintage glamor
What's old is new again in bridal fashion this season.
From pin-up curls to old Hollywood-inspired chignons, brides are reviving the drop-dead hairstyles of bygone eras for timeless beauty with a touch of drama.
Our Statement Pearl Duo is the perfect accessory to honor the style icons of decades past.
The long-lasting low bun
The sleek low bun is the peak of refined radiance.
Unlike free-flowing locks or gravity-defying updos, this relaxed look is guaranteed to keep every hair in place without pulling tight enough to give you a wedding headache.
Take this style from stunning to sublime with our Perfect Pearl Branch Set to feel like a goddess on your special day.
Let us know what your loving.
Sweet wishes,
xo
Morgan
]]>
Every bride wants to look hot on her wedding day – but no one wants to look overheated.
While there's something special about a summer wedding, sweltering temperatures and humidity can be a challenge when it comes to preserving that radiant hairstyle.
Don't sweat it, babe, because M-R has your back. Here are our tips on how to make sure your wedding hair beats the heat.
]]>While there's something special about a summer wedding, sweltering temperatures and humidity can be a challenge when it comes to preserving that radiant hairstyle.
Don't sweat it, babe, because M-R has your back. Here are our tips on how to make sure your wedding hair beats the heat.
Keep it Cool
Heat and moisture are the main tools stylists use to shape your hair – and high temperatures, humidity and sweat are the natural enemies threatening to undo all of their work.
This summer cocktail of conditions can melt away your carefully crafted hairdo. Your best bet to protect your style from the elements is to avoid them as much as possible.
If keeping your hair picture-perfect is a priority, you should retreat to the shade or air-conditioned indoors whenever you can. While you probably want to show off your moves, you'll also want to avoid breaking a sweat on the dancefloor.
Choose a Breezy Hairstyle
Brides who let their hair down run the risk of seeing their styles frizz out or fall limp on a muggy day.
We'd suggest picking a look that keeps your hair off your neck and shoulders, allowing better airflow and reducing perspiration. Some summer-friendly styles include braids, buns, ponytails and breezy half-up, half-down look.
If you don't mind a little mess, you can embrace the heat with effortlessly undone styles, such as beachy waves or a tousled updo.
Hold It Together with Accessories
Accessories can be your secret weapon to extending your hairstyle's longevity when temperatures rise.
Our Perfect Pearl Pin Set, Marquise-Cut CZ Headband and Emerald-Cut CZ Duo are among the many pins, headbands and clips we offer to help secure your hairstyle no matter what the forecast – while also adding some extra 'wow' to your wedding day look.
Extensions can also be a valuable asset for summer brides. High-quality hair extensions are made from durable materials that can better withstand heat and humidity than your natural locks. When properly applied, extensions provide stability that can help you maintain the shape and volume of your hairstyle even in balmy conditions.
Revive Your Style with Touch-Ups
Before the big day, talk to your stylist about techniques and products to keep your hairstyle intact throughout the festivities.
Consider preparing a touch-up kit with items that can help refresh your look. Dry shampoo can be a lifesaver for rejuvenating your locks, adding volume and eliminating greasiness. Blotting papers can also help absorb excess oil without disturbing your hairstyle.
But be warned: fussing too much with your hair can cause more problems than it solves.
A safer alternative is to hire your stylist for the full day so they can be on hand to touch up your hair as needed. It may cost a bit more, but it's the best investment to keep your hair looking flawless throughout the day.
xoxo,
Morgan
]]>
At Morgan Roy Beauty, we cater to all kinds of wedding esthetics – it’s a question of which one suits you best.
We’ve created a guide to help you figure out your bride vibe and find a hair accessory that’s true to your style.
Boho Beauty
You take style tips from Mother Nature herself, and you plan to take full advantage of the gifts that she gave you on your wedding day.
Never one to be hemmed in by conventions or corsets, you gravitate toward laidback, ethereal looks that speak to your inner goddess.
You’re looking for a dress that’s as effortlessly glamorous as you are, finding yourself drawn to airy, billowy fabrics or floral lace detailing.
Whether you’re letting your windswept waves loose or pulling back your locks into a messy bun, we think our bejeweled, botanically inspired All That Glitters Branch Set will add a dash of whimsy to your perfectly undone hairstyle.
Vintage Vibes
Maybe you feel like you were born in the wrong era, but you don’t need the power of time travel to borrow from the best bridal styles of decades past.
Whether you’re channeling Grace Kelly in satin and lace, or rolling up a pair of Audrey Hepburn’s elbow-length gloves, your wedding ensemble is going to be one for the history books.
Maybe you’ve managed to thrift an authentic vintage dress, or you’re putting a modern spin on a retro style.
Whatever fashion era you’re evoking, we know you’ll have the classic coif to match. Tie it all together with our Perfect Pearl Swirl Set for a hairstyle that will stand the test of time.
Fairytale Romance
Once upon a time, there was a princess-at-heart who’d dreamed of being a bride since she was a little girl. So when she found true love’s kiss, she knew it was only a matter of time before she walked down the aisle in a dress that would put Cinderella to shame.
Your real-life love story is deeper than anything you’ll see on Disney, but that doesn't mean your wedding day has to be any less magical.
You put the extra in extravagant, so you’re searching for a ballgown with the voluminous skirt, tulle and trimmings straight out of a storybook.
But what fairytale look would be complete without a tiara? We think you’ll look all the more enchanting in our Halo Pearl Headband fit for a modern-day royal.
Understated Elegance
You don’t need all the bells and whistles on your big day. You’re all about simple sophistication, embracing minimalist styles for maximum impact.
You lean toward clean, classic dresses with just the right dose of glamor. You get that elegance lies in the details, and all it takes is a few accents to make your sense of style shine.
We’d suggest you check out our Classic CZ Pin Set to upgrade your sleek updo with a touch of glitz.
The Modern Bride
It’s not just a wedding aisle; it’s your personal runway.
You’re up to date on all the latest bridal styles, and you’re on the hunt for a bold look that’ll set the trend for all your friends.
Make a statement with our totally trendy Perfect Pearl Duo, which will look just as stunning on your special day as when you rewear them for a night out.
]]>
Your bridesmaids aren’t just there to accompany you down the aisle. They’re your support system, your closest advisors, your personal hype team and your sisters in arms on the front lines of your wedding day. Think of them as your bridal A-team – like The Avengers, but with better costumes.
We know you love all your friends and family members, and it can be difficult to decide who to include in the wedding party. When selecting your bridesmaids, you may want to consider what special abilities each of them bring that could potentially save your big day.
Here are some superpowers to look out when assembling your squad of bouquet-toting heroes.
The taskmaster
More punctual than a Swiss train, more organized than Marie Kondo, able to rally all your friends together with a single calendar invite – it’s the taskmaster, and she’s here to make sure your wedding goes off without a hitch.
Whether she’s tallying bachelorette-related expenses, troubleshooting a mix-up with the vendor or herding guests to the next location, this is the bridesmaid who will remain calm, cool and collected in the face of whatever mishaps may come up during your wedding.
A natural leader, the taskmaster is a great candidate to be maid of honor. But whatever role she’s in, she’ll do whatever it takes to give you the special day you deserve – and do her best to make sure everyone else runs on schedule.
The mediator
Your mother-in-law may be a villain for the ages, but she’s nothing the mediator can’t handle.
Weddings can be emotional pressure cookers, so it helps to have a bridesmaid who can keep her cool even when tensions are running high.
With her preternatural people skills, the mediator can pacify even the prickliest of relatives and defuse any conflicts that may arise.
She’s happy when everyone is happy, so you can leave her to handle the drama while you focus on your vows.
The party starter
She’s the first one on the dance floor, and she’ll be the last one grooving as the DJ packs up.
This firecracker is here to make your wedding a bash to remember (and your bachelorette party a bender to forget).
Whether she’s making sure you get your fill of pre-marital debauchery or making a toast that leaves the room in stitches, the party starter will bring the fun to your wedding festivities – just make sure the rest of your guests can keep up.
The confidante
Of course, you’re close with all your bridesmaids. But when the rest of them are driving you nuts, you know the confidante will be there to commiserate.
This is the bridesmaid who may know you better than your spouse-to-be. She’s comforted you through breakups and championed your true love (even if she’s threatened your fiancé to make sure it stays that way).
You can count on her to lend an ear when you need to vent about your wedding stress and give you a reality check if need be.
She’ll be waiting at the altar to give you one last reassuring look before you say, “I do.” Like all your bridesmaids, she’s committed to making your wedding a celebration of love – not just for the happy couple, but for everyone else who cares about you.
xoxo,
Morgan
]]>Here are some of our tips on how to make Valentine's Day feel special amid all the stress of planning your special day.
]]>You and your fiancé may be so wrapped up in the fuss of finalizing guest lists, coordinating with vendors and figuring out your finances that it can be easy to lose sight of what your wedding is actually about: your love for one another.
Here are some of our tips on how to make Valentine's Day feel special amid all the stress of planning your special day.
Dial down the pressure
This may be your first – and last – Valentine's Day together as a soon-to-be-married couple, so you might be feeling the pressure to make it extra special.
If you and your boo want to go all out, more power to you. But wedding planning can bring a lot expectations — many of which have nothing to do with the two of you — so you may want to consider finding low-key ways to enjoy each other’s company.
Your Valentine’s Day plans could be as simple as savouring a special home-cooked meal, or practicing your first dance in your living room. This is your chance to celebrate your love in an intimate way before sharing it with everyone else at your nuptials.
No wedding talk (but dirty talk is encouraged)
You and your fiancé have probably spent so long sorting out seating arrangements that you have each table memorized. Planning a wedding is work, so why not embrace the holiday spirit by giving both of you a day off.
If the wedding does come up, try to steer clear of the logistics of party planning in favour of reflecting on the more romantic aspects of your big day.
Perhaps you and your fiancé want to workshop your vows by talking about all the things you love about one another. Or maybe you want to get excited for your wedding night by trying out something spicy in the boudoir.
Get nostalgic
Valentine’s Day can be a great opportunity to look back on all the shared moments that made you decide to get married in the first place.
Take a trip down memory lane by visiting significant sites in your relationship, such as the restaurant where you had your first date or the spot where you first said “I love you.”
If you’re exchanging gifts, you could assemble an album of photos that capture the trajectory of your relationship.
It could even be as simple as taking the time to reminisce about the milestones in your love story as you look forward to your happily ever after.
Show yourself a little love
You may be so stressed trying to make everyone happy in your wedding planning that you’ve forgotten to look out for number one.
Make Valentine’s Day an opportunity to treat yourself to a little self-care, such as a relaxing day at the spa or getting a fresh blowout.
Nothing is sexier than feeling sexy, so maybe pick up some new lingerie to remind your man just how lucky he is to have locked you down.
And remember: Your celebration of love doesn’t need to be limited to Feb. 14 or your wedding day. It’s the way you and your fiancé show up for each other every day that made you want to say “I do.”
]]>
While your hair will be the crowning glory of the ceremony, here are some tips to help your bridesmaids find hairstyles that will make them feel stunning on your special day.
To match or not to match?
Many of today's brides are ditching the uniform looks of the past in favour of letting every bridesmaid pick a style that best suits her.
It may be your big day, but every member of your bridal party is going to have their own feelings about how they look. Chances are that asking your bridesmaids to style their hair in a way may not flatter their features won't make for a pretty picture.
We love the "choose your own 'do" trend because it embraces the different hair types, textures and tastes that make your bridesmaids beautiful. You love that your girls each have their own one-of-a-kind look, so why ask them to look the same?
Variations on a theme
If consistency among the bridal party is an important part of your wedding day vision, you can still achieve hairstyle harmony without mandating copy-and-paste coifs.
There are plenty of styles that can be adapted to accentuate each bridesmaid's individual assets.
For example, a ponytail base will look just as gorgeous on your bestie rocking her natural curls as it will on your sister who wants a slicked-back style straight from the runway.
Accessories can also be an alluring tool to tie together an assortment of bridesmaid hairstyles.
Our Perfect Pearl Pin Set comes in a set of nine to allow each bridesmaid to adorn her look with a touch of timeless elegance, while our Perfect Pearl Swirl Set can be split among five bridesmaids to secure their locks all night long.
Consider and coordinate your styles
You've probably planned to make sure every hair will be in place before you put on your veil. But it's possible some of your bridesmaids haven't put as much thought into their looks, which could lead to last-minute hair fiascos.
Ask your bridesmaids to think about what look they're going for well ahead of the wedding, and ideally, find a picture for reference.
Consult with your stylist to get a sense of how much time they'll have to style each bridesmaid, and encourage your girls to consider those constraints before picking the most complicated bouffant on Pinterest.
Give your bridesmaids a preview of your wedding locks to help them choose complementary styles. You can even ask them to share their looks in the group chat to avoid unintended copycats, clashing coifs – or worst of all – upstaging the bride.
Bridal suite best practices
We encourage you and your bridesmaids to get as messy as possible during the bachelorette party. But to make sure everything runs smoothly in the bridal suite, your stylist is going to want you to show up with clean and dry hair.
It's not uncommon to hit a few styling snags on the big day, so ask your bridesmaids to do whatever preparation they can to reduce their time in the chair.
You're also going to want to ask each bridesmaid to bring a little extra cash in case their look needs a bit more work.
All it takes is a little bit of planning to make sure everyone shines while walking down the aisle, especially the main star, the bride.
xoxo,
Morgan
]]>No matter what "I do" hairdo you're going for, a pre-wedding hair-care regimen can help you achieve that fairytale look when you're walking down the aisle.
Here are a few of our tips on how to unlock healthy, bouncy, lustrous locks that would make Rapunzel green with envy.
Consult your hairstylist
You've said "yes," and sent pics of the ring to your family and friends (and maybe frenemies eyes emoji). Next up on your to-do list? Call your hairstylist.
The wedding may be months away, but the truth is, knockout hair isn't primped in a day.
Your hairstylist can give you personalized recommendations about what shampoo, conditioner and treatments are best for you.
You may also want to book more frequent trims to clean up those split ends while maintaining your length.
Hydrate, hydrate, hydrate
When it comes to getting that bridal glow, H2O is your hair's best friend.
In addition to using moisturizing hair products, it's important to follow the core principles of hair hydration:
Less is more. Over-washing, over-styling and over-processing are some of the biggest culprits when it comes to dried-out hair. It's time to ditch daily washes, put down the curling iron and take it easy on the hair dye. Au naturel is the way to go for the best results on your big day.
Turn down the heat. You're hot enough as it is, babe, so any more heat is only going to dehydrate your hair. Cold showers can help seal in moisture and close the pores in your scalp to prevent buildup of grease and dirt. If you're set on using heat-styling tools, be sure to turn them to the lowest setting, and protect your hair with a thermal spray.
What's the weather? Too much sun, dry air, wind, rain or humidity all risk damaging your hair. Protect your hair from the elements by wearing a hat or scarf. And it turns out mom was right about not going out with wet hair when it's chilly — not because you'll get sick, but because cold air could lead to breakage.
They don't call it beauty rest for nothing
There are plenty of ways you can look after your locks while getting some shuteye.
Bring a portable humidifier into your bedroom to ensure optimal conditions for your hair while you're sleeping, with the added benefit of hydrating your skin.
All of that tossing and turning over wedding planning is going to create friction that will cause your hair to tangle. So say goodbye to bedhead with our Silk Sleep Cap, which cocoons the hair to protect against breakage, retain moisture and preserve your style overnight.
Massage your scalp – both for your tresses and to destress
Healthy hair starts at the scalp. Regular scalp massages can help exfoliate dead skin and debris around your hair follicles, while increasing blood circulation to the area.
And when wedding stress feels like enough to make you want to pull your hair out, scalp massages have been shown to relieve anxiety and tension.
Check out our guide on how to perform this hair-care and self-care routine that's right at your fingertips. For those looking to dig deeper, we recommend using our Essential Brush to maximize the benefits.
At the end of the day, it's all about showing you and your hair a little love. So play some music, light some candles or use your favorite essential oils. Anything that'll help you rest your pretty head before the big day.
]]>The number of decisions that need to be made in preparation for a wedding can be overwhelming.
Thankfully, some decisions, like whether to wear your hair up or down, are determined by choices you’ve already made.
The two main things you’ll want to consider when making this choice are: the neckline of your gown and how you usually wear your hair.
The neckline of your gown will tell you everything you need to know about the most flattering length and style to fit the dress.
You’ll also want to consider what you usually do, and there are two schools of thought here. You can either wear your hair how you do every day, a style that you are comfortable with and makes you feel good already, or try the opposite to signal that it is a special occasion.
Another thing you may want to take into consideration is location and weather. A hot and humid wedding may be better suited for a hair up look.
At the end of the day, it’s your day and you should hopefully feel empowered to make whatever choice excites you!
]]>The two main things you’ll want to consider when making this choice are: the neckline of your gown and how you usually wear your hair. The neckline of your gown will tell you everything you need to know about the most flattering length and style to fit the dress.
You’ll also want to consider what you usually do, and there are two schools of thought here. You can either wear your hair how you do everyday, a style that you are comfortable with and makes you feel good already, or try the opposite as a signal of it being a special occasion.
Another thing you may want to take into consideration is location and weather. A hot and humid wedding may be better suited for a hair up look.
Different Necklines such as;
High Neck
Try Hair Up
For a dress with a high neckline, you’ll want to opt for a hair up look to avoid distracting from the beautiful details of your dress. There are endless updo options that can be personalized to suit your style from the part you choose to your accessories.
Strapless
Try Hair Up or Hair Down
A wedding dress with a strapless neckline is the ultimate blank canvas for hair. Hair down in loose waves could look just as beautiful as a classic chignon. To help make this decision, consider if you’ll be wearing a necklace and how visible you’ll want it to be.
Plunging
Try Hair Up or Hair Down
A plunging neckline can have a throwback, retro '70s feel when paired with voluminous loose curls. If you love a sexy, tousled look, this is the style for you.
Empire/Square
Try Hair Down
This sophisticated neckline pairs well with soft and feminine styles that include wispy curls or braids. Alternatively, a square neck with a sleek middle part hairstyle gives a more modern, fashion feel.
Off the Shoulder
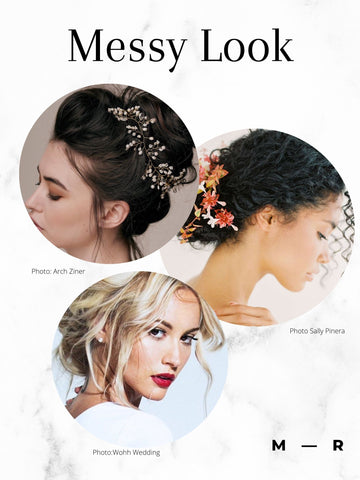
This romantic neckline is best paired with a hairstyle that feels soft and still shows off your collarbones. We recommend a look that pulls to one side, either up or down like a braid or bun. Another great option is something wispy like a messy look bun.
At the end of the day, it’s your day and you should hopefully feel empowered to make whatever choice excites you!
]]>
Trust me, there’s no better feeling than looking back at your wedding photos and still being in love with your hair! An elevated messy bun is such a great option for brides that want a look that feels wispy and ethereal.
I love seeing this style on brides of all hair types, and think it’s a fantastic choice for a hot destination wedding (get the hair off your neck, you’ll thank me later), and paired with dresses that have intricate necklines.
Of course, you could bring an inspiration shot to your stylist, but it’s also a look that you could try to achieve yourself. The key to making the DIY option work is incorporating some kind of accessory that highlights the style.
One of my all-time favourite looks is a messy updo with Peal U-Pins. These pins make achieving the messy look possible since it holds the hair in place, but add an element of class that creates a wonderful balance against the wispier locks.
Ready to try it for yourself? Let’s get started!
]]>An elevated messy bun is such a great option for brides that want a look that feels wispy and ethereal. I love seeing this style on brides of all hair types, and think it’s a fantastic choice for a hot destination wedding (get the hair off your neck, you’ll thank me later), and paired with dresses that have intricate necklines.
Of course, you could bring an inspiration shot to your stylist, but it’s also a look that you could try to achieve yourself.
The key to really making the DIY option work is to incorporate some kind of accessory that highlights the style.
One of my all time favourite looks is a messy updo with Peal U-Pins. These pins make achieving the messy look possible since it holds the hair in place, but adds an element of class that create a wonderful balance against the wispier locks.
Ready to try it for yourself? Let’s get started!
Step 1: Detangle hair with my go-to grooming brush for a smooth finish.
Step 2: Separate the hair from centre all the way to centre back. My go to tool for separating is my tail comb! Next, section from the top of the hair to behind the ear on both sides. This will leave a piece at the back of your head that you can turn into a low ponytail. This allows us to work smarter, not harder!
Step 3: Use an elastic cord to create a low pony with the back section you’ve just created. Use your favourite heat protectant on this back section you’ve created. If you’re working with straighter hair, use a curling iron, flat iron if you prefer, and your tail comb to curl the hair in this back section. To keep the curls consistent, make sure that you’re curling pieces that are similar in size. Hold the curls in place using my aluminum clips.
Step 4: Turn your side sections into smaller pieces. Separate these sections into layers between the top and bottom, this will make your curling process way less overwhelming. Apply heat protectant again to these new spots and begin to curl away from the face and from the base/root. This will help create volume, which is great if we try to achieve big and bouncy curl.
Step 5: Repeat everything from step 4 on the other side of your head.
Step 6: Next, we’ll move towards the top section that you had created. Take horizontal sections (again of similar size) curling the hair away from the face. When getting to the strands right near the front of your face, feel free to play with how you want this piece curled that best suits your face shape.
Step 7: Once all of your hair has been curled and cooled, you can remove the aluminum clips that were keeping the curls in place and start to rake the curls out with your fingers. Use a light hairspray to help hold and mold the hair. Feel free to use your aluminum clips again to hold your front pieces how you like after you’ve hairsprayed.
Step 8: Moving to the back of your head, use a wide tooth tail comb to finish smoothing the curls in the back. Use small clear hair elastics to separate the large back piece into three small sections. Wrap the elastic near the bottom of your hair, not near the root. Pin the section that is now in the centre up to the rest of your hair.
Step 9: Working with the two new side sections in the back, use a U-Pin and weave it through the clear elastics (do this on both sides) and then pin these pieces to the original low ponytail you created. Release the centre piece and sue the same U-Pin technique here. IF you’re hair is very long, you can wrap the hair into itself a little to shorten it. Use some more hairspray in the back section to hold this piece in place. You can now remove the aluminum clips you had holding all of the hair.
Step 10: Use a strong hold hair spray now across the hair style and feel free to refine baby hairs. And the most existing part, you can now add your beautiful decorative pearls to finish off the look.
This style is for you, so don’t be afraid to try things that make it feel more unique and authentic to your personality!
]]>The right wedding hair accessory does a lot more than keep your locks in place, it can be the touch that completes the aesthetic story you’re trying to tell.
There are enough stressful details to consider when planning a wedding, so why not make your hair journey something to get really excited about and enjoy?
I’ve combed through hundreds of accessories to bring you a small, carefully chosen collection that can truly work for any bride with any hair type.
Finding Inspiration
I can’t recommend Pinterest enough for creating a mood board for your wedding hair look. You’ll be able to sift through different hairstyles, accessories, and how the two are paired together.
Remember to consider the details of your dress like it’s neckline, shade, and style. Your stylist might also be able to assist and provide their own expertise in regard to what style and accessories would best suit your gown.
I have always been drawn to classic styles, and so when creating this collection it was an easy decision that I would incorporate a range of accessories that feature pearls and cubic zirconia.
Accessories that feature these two items are incredibly versatile and can be layered, mixed, and matched to create an aesthetic that you’ll love long after your wedding day.
Choosing The Right Accessory
When speaking to your stylist, they’ll be able to tell you what kinds of accessories are needed in order to keep your style in place all wedding long.
Most commonly, a few bobby pins will be required at the very least, so this is a great opportunity to find some that not only serve for function but also style. Of course, accessories can also be used simply for aesthetics and not to keep a style in place.
Accessory Types
All of the accessories in my collection are available in both a pearl and cubic zirconia version, some in gold and some in silver. Feel free to play and get creative!
Bobby Pins
Bobby Pins can be used to help hold styles like buns and half up/half down looks, and also aesthetically in a fully hair down look for example. The collection includes very simple bobby pin styles that feature a single pearl or single cubic zirconia, as well as more intricate bobby pin versions including:
Swirls
Swirls or spirals are an absolutely gorgeous way to decorate braids and buns. Place one or two for a very delicate look that catches the light, or layer in as many as you’d like for something more dramatic. The collection includes:
U-Pin
U-pins are the ultimate companion for any bun and updo. They are a necessary feature to keep these styles in place, so why not choose one that elevates the look as well?
The collection features a few different styles of u-pins including:
Band
A band can keep your hair from getting caught in your gloss and out of your face and simultaneously completely elevate a look. I absolutely love the look of layered bands for a wedding hair style. The bands in this collection include:
Your wedding day is a big deal, and I want you to feel as beautiful as possible.
One of my biggest tips that I recommend to all of my clients is to try a few different hair options out before the big day, so you really know which one you’ll feel the best in and which will compliment your wedding.
The folded ponytail is such a great option because it’s surprisingly not too challenging, and is something you can try for yourself before bringing to your stylist on the big day.
]]>One of my biggest tips that I recommend to all of my clients is to try a few different hair options out before the big day, so you really know which one you’ll feel the best in and which will compliment your wedding.
The folded ponytail is such a great option because it’s surprisingly not too challenging, and is something you can try for yourself before bringing to your stylist on the big day.
Follow along for an easy-to-achieve and elegant look!
Step 1: Use your wide tooth tail comb to create a centre part and a flat brush to smooth and detangle all of your hair.
Step 2: Use an edge brush and a bit of hairspray to smooth the flyaway you don’t want.
Step 3: If you’re hoping to change the texture of your hair, do so the way you normally would now.
Step 4: Use your aluminum non-marking clips to hold the front in place, and then create three sections in the back. The middle section should be the largest, with the two side sections being slightly smaller and the same size as one another. Use your non-marking clips again to hold these sections in place.
Step 5: Using a clear elastic, make a ponytail with your larger middle-back section, securing the elastic parallel to the base of your neck. Do the same with the two side-back sections. Take the pony-tail on the left and create a hollow, pulling the centre piece through. Then take those two ponytails, pulling them through and over to the right side. This will create an elegant overlap.
Step 6: Next, use a U-Pin and slide it through the base of a clear elastic in the back. Take a small piece of hair near the underside of your hair to wrap around the elastic to create a clean look. Wrap a few times for the best coverage. Create a loop and slide it through the U-Pin to hold everything securely in place. Remove any non-marking clips you still have in.
Step 7: Elevate and finalize the look with a touch of hairspray and for extra glamour, a single pearl bobby pin.
This hairstyle can be modified in so many ways. Feel free to browse through all of my accessories to see if there is something else that you might add to make the look feel that much more, you.
]]>
Experts and trendsetters are forecasting what the trendiest wedding hairstyles of 2022 will be so you can feel your best on your special day.
Of course, some styles are so classic that we see them every wedding season, occasionally modernized to reflect the time.
Now is a great time to start thinking about what look you’d love, so you have ample time to secure your accessories and dream stylist.
Below is a collection of our top picks of looks that we think you’ll look back on and love forever.
]]>Of course, some styles are so classic that we see them every wedding season, occasionally modernized to reflect the time.
Now is a great time to start thinking about what look you’d love, so you have ample time to secure your accessories and dream stylist.
Below is a collection of our top picks of looks that we think you’ll look back on and love forever.
Perfect for:
We recommend a symmetrical middle part for this sleek look, a hair parting that suits many face shapes.
This classy and less-fuss look is ideal for both the minimalist bride who’s chosen a very simple dress and the bride who will be wearing an extravagant dress and doesn’t want her hair to distract from it.
The clean middle part is great for a hair down style, low bun, and low pony.
Perfect for:
A messy style for your wedding gives the impression of ease and whimsy while still maintaining elegance.
Loose pieces can be pulled intentionally to frame the face for a fresh take on the classic chignon.
Megan Markle famously embraced a messy and elegant look for her royal wedding, and we’re loving all of the looks that have come from it. This style is amazing for naturally textured hair and works beautifully with accessories.
Perfect for:
A half-up half down look is a timeless wedding hairstyle that can be extremely personalized to fit your unique look.
This style allows you to have the best of both worlds -- a long-haired look hopefully without tresses that get caught in your gloss.
The look can easily be made to feel more bohemian with more messy styling or more polished for a sleeker style. The shape of the look allows for a headpiece or jewelry to take centre stage.
We love this look with loose barrel curls, braids, and natural curls, for both medium and long hair lengths.
Perfect for:
The possibilities of styles you can achieve with your naturally curly hair are pretty much endless, it all just depends on what would make you the happiest.
For 2022, we’re loving defined curls pinned to the side with pearl hair accessories, hair braided then pinned half up half down with headpiece accessories, styled into a low bun or worn kinky/ coily and combed out to have maximum volume.
Perfect for:
Your hair accessories finish the story of your wedding day look and are the perfect opportunity to express yourself.
Going into 2022, we absolutely love pearl detailing. Whether that be large pearled headbands or small single pearls delicately placed throughout the style.
Embellished bobby pins are not only gorgeous but also extremely practical for keeping styles like half up and half down in place.
Finally, claw clamps in a square style over the traditional round shape are something we expect to keep seeing more of for the bridal party or the casual bride.
]]>Coming home from New York Fashion Week a few years ago I walked away with memories that would last a lifetime - plus a beauty tip that would quickly become an absolute staple for me personally and all of my clients.
Every hair stylist and makeup artist was using the same set of bobby pins on the models, and I figured, there must be something special about them if literally everyone is using them.
It wasn’t until I tried them for myself that I understood why they were in the beauty kits of all of the professionals.
The T&T Bobby Pins are made in Japan and are incomparable to any that I’ve used before. You might be thinking, “what’s the big deal, they’re just little pins, how big of a difference could they really make”? These small and mighty dark blue pins are absolute magic.
But you don’t have to take my word for it, grab a set of 30 for yourself and you’ll see exactly what I’m talking about!
Comparing these to a typical set you might pick up from Shoppers Drug Mart or the Dollar Store you’ll quickly feel how different the grip is on this set.
They’ll hold your hair in literally any style, but thanks to the cushioned tips (that don’t pop off), they don’t damage your hair and hurt when it’s time to take them off and let your hair down at the end of the day.
I can say from personal experience that these hold hair in place all day.
Remember back when we got to party and dance the night away? These pins were my saving grace back then, and continue to be now.
Thanks to the amazing quality and strength of these pins, you need less of them at a time to keep your style looking perfect.
This also means that they last much longer, meaning less frequent repeat purchases which is way better for the environment.
I recommend keeping these precious pins stored in the MRB tin keeping them safe so you can have them for as long as possible!
When you’re ready to get your hands on some more, you can pick up a re-fill of the pins without the tin for less waste.
Right now, I carry these in 2-lengths; the Mini is 4 cm and the Regular is 5 cms.
If straight bobby pins aren’t really your thing (or you’re a sucker for a sweet ballerina bun), you can also snag a pair of U-Pins!
T&T Bobby Pin Fast Facts
I remind myself to be more like <Nature> daily. A tree does not ask itself if it is good enough or if its branches grew in a way that was beautiful.
A flower does not question if its bloom is rich or if it is worthy. Nature is beyond the binary of good/bad right/wrong that humans often cling too.
]]>Q: Tell us a little bit about yourself!
The name of the incarnated baby which I have grown from is Bo. My pronouns are Them / They. I am an Energetic Herbalist, Plant Alchemist, a gathering/ experience curator, a breathwork facilitator, and an artist.
I am passionate about bringing folks into a deeper connection with the living world both internally and externally. In addition to the realms of plants + consciousness embodiment, 'Conscious Pleasure' is a realm I feel greatly about.
This looks like questioning and exploring what it means to live in active pleasure consciousness in my own life and as well holding community gatherings and spaces focused around expanding, exploring, and evolving this concept's actualization on earth.
I enjoy beginning each day with mediation, yoga, a beloved cold shower, and journal exercises. I also think mangos are super sexy.
Q: What beauty advice would you give your younger self?
This is a question I explore often in my relationship with my inner child and pure expression. I definitely have some words I share with my past, present, and future self.
Q: What makes you feel the most beautiful?
Nature.
How gentle it is. How fierce it is.
How it can hold you like the dew upon the petals that slowly opens with the waking glimmer of dawn.
Or cut you open raw like the waves crashing rocks into sand as they throw their body against the shore pulled by the invisible forces of the moon.
Or the way a leopard shifts from complete stillness and equilibrium into the full momentum of a hunt with such finesse and mastery. Nature is sexy and spending time with it reminds me of my own wild celestial soul.
I find the interconnected wild and yet completely balanced micros and macro cosmos of the web of life so supple, juicy, and deep that when I stop and stare into it and breathe deep into my soul, allowing the remembering that I am one with it, it moves my whole soul and fill me with ether.
These moments I know so clearly what lays beyond the binary concepts of beautiful or ugly, and I am in full knowing of peace.
And when I move through the world in this knowledge and this embodiment, I am able to look at beautiful around me not just as the moments that are neat and tidy and put together but also as the moments that are raw, rich, and dripping with possibilities of evolution.
When I am brave enough to open to all of this, I feel the most beautiful as I find there is so much more to beauty than what lays between the concept of what is ‘right or wrong’.
And of course, the sun. When I spend time with the sun, that is a lover, who knows how to provide deep nourishment.
Q: What’s your most regrettable hair choice?
Morgan’s hair magic is some kind of mastery. I have so much love and respect for Morgan and how much finesse and skill she has at her craft.
I admire how gracefully she balances honouring my strange hair desires and then meeting them with her insane hair skills.
So, I can honestly say that every time Morgan's artistic expression graces my hairs, it’s been divine.
Previous to her magic, I definitely have had some ‘special cuts’…
The first haircut I really didn’t like was when as a child I chose one of the ‘funky’ hair cuts from the ‘haircut book’ at the salon and the hairdresser warned me I would have to style it every day and for some reason agreed (knowing literally nothing about styling hair).
Let’s just say it was not my coolest look and I ended up looking like a chia pet.
Q: If you could have another hair look other than the one you have right now, what would it be?
At the start of quarantine I shaved my head and have been growing it out since then and it is finally long enough to work some magic with.
I am thinking of a choppy bob and I want to bleach and miss-match dye my eyebrows again.
Q: Do you have a hair tip to share?
Have someone cut your hair who can shape + design your haircut in a way that meets how much or little time you want to spend on it each day.
And if you are craving a strange beautiful expression of body hair, don’t wait for external affirmation, just get in with it.
And make sure to carefully choose a hair dresser that has the skills to actualize your desires masterfully (i.e. Morgan and not the random lady from when I was 12 who made me look like a chia pet).
Q: What’s your fave Morgan Roy Beauty Product?
I love their paddle brush. It is super beautiful and I love the way it feels against my scalp as I brush my hair. It feels like I get a head massage every morning. And MRB bobby pins are always a good one to have on hand for braids and various hair play expressions.
]]>
We’re all missing the salon a lot at this point, and our hair might be showing it. If you’re in desperate need of a colour, want a bit of a pick me or just want to try something new, learning how to dye your hair at home is the answer.
Doing a hair colour is nothing to be afraid of! So long as you’ve got the right materials and follow these tips, you’ll walk away from this feeling amazing.
Before we begin, I’ll mention that I highly recommend getting in touch with your regular hair stylist to see if you can pick up/get dropped off your hair colour.
This will ensure the best colour match of course, plus, your stylist would love to hear from you.
]]>Doing a hair colour is nothing to be afraid of! So long as you’ve got the right materials and follow these tips, you’ll walk away from this feeling amazing.
Before we begin, I’ll mention that I highly recommend getting in touch with your regular hair stylist to see if you can pick up/get dropped off your hair colour.
This will ensure the best colour match of course, plus, your stylist would love to hear from you.
What you’ll need:
When it’s time to dye, you’ll want to have your space set up with all of the things on your checklist so you’re not scrambling to find things when the dye is already on!
Pro tip: if you drop any hair colour on the counter tops or floor during the process, pause for a moment and use your cleaning product and deal with it as soon as possible. Hair dye stains!
To avoid stains on your skin, especially if you’re using a dark hair dye, you can apply a thin layer of conditioner as a barrier.
Step One
Mix your product in the bowl and place it on your plate or put into your dye bottle. I prefer the plate and bowl method (especially for the front of the hair). but if you’re using the bottle, try to squeeze slowly and carefully to nott apply too much product.
Next , put on your gloves and sub-section your hair. I recommend centre parting your hair and then grabbing a 3 inch section on either side, clipping the rest out of the way. Apply product close to the scalp through your first few sections, then using the tail of your comb or product brush to continue exposing new roots.
Things to remember
Step Two
Once you’ve finished the front of your hair, it’s time to move on the back. Remember, no one sees the back of your head in a zoom meeting, so it’s okay if you make a few mistakes! Try your best to move slowly though, and to take shorts breaks if your shoulders are hurting. Keep your hand held mirror handy when working at the back of the head and try to keep your sections small. Your clips are your friends here, use them to keep your sections clean.
I recommend starting at the crown of the head first. Then, centre part the back of your hair and pin one side out of the way. Then work from the top layer of hair through one small layer at a time on one side, then move onto the other side.
Step 3
When the hair colour has been applied everywhere, remove any additional clips or pins and then add a bit more product to any tough grey spots you might have missed. Start a timer for 45-minutes and use this time to clean your area.
Step 4
Once your timer has gone off, it’s times to rinse and shampoo. Make sure your hair is running through clear before you add any shampoo or conditioner, and try to keep the product running off your hair away from your eyes. Apply your favourite shampoo and conditioner the way that you normally would.
____
Of course, this DIY touch up job won't replace your hairdresser, but it should get you by until it’s safe to see each other again!
]]>
Q: What beauty advice would you give your younger self?
I started modelling after finishing my undergrad - I wanted to do something I enjoyed, even if I was scared to do it. I really didn’t want to follow the safe path, and then look back later in life thinking “what if”, so I went for it and haven’t looked back since. Acting is the next challenge I’m tackling, and I am so excited for the opportunities that have come my way so far. My favorite thing about what I do is that I get to work on myself everyday and constantly aim to be the best I can be. In my spare time, I run the platform @plasticfreeto on IG along with my sis, and we host sustainability-related workshops and events. I love to talk about making the world a better place, and I love showcasing people and brands who are living and breathing positive change. If I could have coffee with anyone in the world, I wouldn’t be able to choose - Alexandria Ocasio-Cortez, Jacinda Ardern, Malala Yousafzai, and Beyonce are all goals.
Q: What beauty advice would you give your younger self?
Q: What makes you feel the most beautiful?
I feel the most beautiful when I am fully present. Whether that’s singing/making weird noises in the shower, skipping through the woods, dancing on set between takes, hosting a workshop, or just listening to a friend, I feel I’m at my best when I am honouring my truth in the moment!
Q: What’s your most regrettable hair choice?
Flat ironing my hair all the time in high school. The heat damage was not a vibe, plus pin straight wasn’t really my best look. It was just the only look I knew how to do.
Q: If you could have another hair look other than the one you have right now, what would it be?
Long and curly/wavy. I miss being able to run my fingers through my hair, which is why I love experimenting with wigs!
Q: Do you have a hair tip to share?
A silk bonnet does wonders for my curly hair! The bounce and shine stays twice as long without me having to wash or refresh my hair.
Q: What’s your fave Morgan Roy Beauty Product?
The bobby pins hands down!!! Strong enough to contain all this volume and really hold my hair in place, but they also slide out super easy without catching on my curls!! They’re truly a thing of wonder and beauty, I’m obsessed.
]]>Webcams have a tendency to make heads look smaller, so styling your hair in a way that creates volume is going to work really well here. Since the camera is only going to see what you show it, you don’t even have to bother styling the back of your head if you don’t feel like it. If it’s been a while since your last colour and your roots are starting to show, you can always angle your camera a little bit lower to cut the roots right out of the frame!
Other Tips
In terms of body placement, be mindful of the fact that looking too casual and relaxed may not be the most flattering. Instead, sit tall and proud, facing head on the camera, with your arms on the table in front of you to maintain shape.
I hope that you use these tips and feel absolutely gorgeous on your next call happy Zooming!
]]>But there’s a sense of normalcy that we could all use that could be achieved by getting ready for meetings the same way we once did for work. These are tips that I use before and during a meeting to make sure I look my best and feel the most confident.
Setting Up Your Laptop + Space
Step 1 - Make sure to choose a spot with good lighting. Set up your camera in front of your window or light source, not behind it! If you don’t have natural light, avoid overhead lights and instead, place your light behind your computer.
Step 2 - Be mindful of how close or far you are from the camera. Being too close can feel a little awkward (not to mention, everyone can see every line and pore on your face), and too far can feel disconnected. For the best framing, have below your bust and the top of your head visible, placed about an arms length away from the camera.
Step 3 - Use a white sheet + a box or some books to create a cheap prop for your laptop. Place the sheet over top of the box or books with your computer overtop. To find the perfect framing we went over in the previous steps, tilt your laptop from the hinge from above the box/books to fill the frame correctly. The white sheet adds as an extra light bounce for your face!
Step 4 -
Looking Your Best
IF you don’t have a ton of time to get ready for your webcam call, try these tips to look great in a crunch.
Wardrobe
My top wardrobe tips for webcam meetings are a turtle neck. They look flattering on pretty much everyone and are the perfect classy casual look.
Makeup
For makeup, I recommend a pop of colour on the lips to avoid looking washed out (trust me, I love a nude lip, but they just don’t read as well on camera!) Skin can also tend to look really oily on camera, so powder really is your best friend here! To take things to next level, add a darker coloured powder to counter and create depth and shape to your face.
Hair
Webcams have a tendency to make heads look smaller, so styling your hair in a way that creates volume is going to work really well here. Since the camera is only going to see what you show it, you don’t even have to bother styling the back of your head if you don’t feel like it. If it’s been a while since your last colour and your roots are starting to show, you can always angle your camera a little bit lower to cut the roots right out of the frame!
Other Tips
In terms of body placement, be mindful of the fact that looking too casual and relaxed may not be the most flattering. Instead, sit tall and proud, facing head on the camera, with your arms on the table in front of you to maintain shape.
I hope that you use these tips and feel absolutely gorgeous on your next call happy Zooming!
The key product to add to your nighttime hair routine is a silk bonnet. When shopping around, make sure that the one you purchase is actually silk- on the inside and the outside.
]]>
One of my favourite ways to set myself up for a good hair day is with some night time prepping to connect with myself and make things easier for myself the next morning.
Doing this will not only save you time, but also get you into a beautiful mindset that should trickle into the rest of your day. I don’t know about you, but having my hair look its best puts me in a great mood!
Start by pulling out your fave brush and gently detangling your hair. You can close your eyes and focus on the feeling of the bristles against your scalp for a massage while taking some deep, soothing breaths.
Next, grab and apply a dry shampoo which will work to prevent waking up the next day with excess oil on your scalp. Apply majority of your product along your part and near your temple, since these spots show oil build up really easily.
Once you’ve applied it to the spots you needed some wicking, run your brush along your hair again to distribute it all nice and evenly.
Once you’re all brushed out, set your part with a comb and hold it in place with some no marking clips. Doing this before bed ensures that no matter what position you end up sleeping in, your hair can stay relatively intact, making styling the next morning a breeze.
If, like me, the hair at the back of your head has a tendency of flipping up, you can also use one of your clips behind your ear.
The key product to add to your nighttime hair routine is a silk bonnet. When shopping around, make sure that the one you purchase is actually silk- on the inside and the outside.
My bonett can you can shop here is exactly what I look for in this product. Silk creates a nice slip around your hair that keeps it from getting fuzzy or frizzy while you’re getting your beauty sleep.
I also recommend looking for one that is adjustable, so that you can secure it to your head to ensure it doesn’t fall off.
Be careful not to tie it too tight though, waking up with the band of the bonnet around your forehead is hardly ever cute! You’ll want to place your bonnet on your hair after you’ve secured it in place with your clips.
Hopefully, adding this short and simple step to your nighttime routine saves you lots of time on styling the next morning, so you can do the other things you love and make yourself feel good. Gratitude journaling over a delicious breakfast anyone?
]]>Q: What beauty advice would you give your younger self?
A: I would tell my younger self to do absolutely whatever they wanted. To buy those wild colours, mix prints, and be bold. I wasted so much time doubting myself and feared being judged by my peers, that I missed some crucial opportunities to express myself. Really, I would just encourage myself to be as weird and adventurous as my heart desired.
]]>Q: Tell us a little bit about yourself!
A: Well, hey, I’m Yaz. I’m a queer, non-binary freelancer from Toronto who aims to play and enjoy the experience of being a human. I teach yoga (online and in real life), write some words for the internet, and dabble in an assortment of kinky related career things.
Q: What beauty advice would you give your younger self?
A: I would tell my younger self to do absolutely whatever they wanted. To buy those wild colours, mix prints, and be bold. I wasted so much time doubting myself and feared being judged by my peers, that I missed some crucial opportunities to express myself. Really, I would just encourage myself to be as weird and adventurous as my heart desired.
Q: What makes you feel the most beautiful?
A: I feel the most beautiful when my look encompasses both masculinity and femininity. This doesn’t mean looking androgynous, more like, multi-layered and honest. Anytime I feel like the way I am presenting is an authentic representation of how I see myself or am feeling at that time is beautiful to me. Currently, my bleach blonde brows are making me feel uber-hot as well.
Q: What’s your most regrettable hair choice?
A: My father was a redhead as a kid, he had the most beautiful curly locks that I would obsess looking at photos of. I was always so envious, so much so that 15 year old me decided that I should become a redhead myself. At the time, I didn’t have a particularly good hairstylist, so looking back at the colour that she chose for me makes me cringe so hard. While I was rocking it, I loved it, but looking back at it I ask, how did any of my friends let me do that?!
Q: If you could have another hair look other than the one you have right now, what would it be?
A: Oh, such a fun question! I really loved having a buzz cut a few years ago, so sometimes I fantasize about having that again. But a hair look I’ve never had (and probably never could because my locks are curly), would be a blunt black bob with bangs... Wow, say that 3 times!
Q: Do you have a hair tip to share?
A: For all of my curly-haired friends, try “plopping”. Grab a cotton t-shirt and wrap your damp hair inside it and wear it like a ridiculous hat for 15 minutes. Your hair will have some awesome volume once it’s off and ready to take your product!
Q: What’s your fave Morgan Roy Beauty Product?
A: Just one?! From the Essentials Collection, I am obsessed with using the wide-tooth comb. It replaced every other comb in my collection because this one always outperforms. I also have the Lace Bunny ears from the Tantalize Collection. So cute for photos and jut wearing when I want to feel sexy.
We always want what we don’t have right? So many of my curly haired clients spent years straightening their hair with heat tools, but now want to embrace their natural locks.
Thankfully, I have some tips and tricks to help your curls come back to life and make you feel amazing about styling without heat.
Just like with any other transition like eating healthier and exercising regularly, letting your curls come through is also a journey. Enjoy the process as much as you can!
]]>Thankfully, I have some tips and tricks to help your curls come back to life and make you feel amazing about styling without heat.
Just like with any other transition like eating healthier and exercising regularly, letting your curls come through is also a journey. Enjoy the process as much as you can!
Things to Remember
Styling Your Natural Curly Hair
Once you’ve chopped off those dead ends, it’s time to style!
Step 1 - Keeping your hair damp is going to be key in the styling process, so begin by spraying your hair with some warm water, throw on your fave leave in conditioner, and begin detangling with a wide-tooth comb
Step 2 - Get your hands on the right products, we recommend a 2-in-1 that can both soften curls + keep them in place. Apply the product generously to your still damp hair (either with your head upside down, or in sections), but be sure to be gentle! If using your fingers aren’t cutting it, you can use your wide tooth comb to help distribute and coat the hair evenly. Most people’s hair will be flatter near the back, so be sure to add some extra love there. This is also the right time to choose your part!
Step 3 - When moving away from using heat tools to style, your best friend when it comes to more refined curls will be your fingers and a light weight, no mark clip. Grab a few small sections of hair that could use some extra definition and volume and wrap them around 2 of your fingers, clipping the spiral in place with a clip (this is a pin curl!) . You’ll really want a clip that’s light and doesn’t make to keep the curl as perfect as possible.
Step 4 - Next, we wait! You’ll be letting your hair air dry, using the natural heat of the outdoors if it’s warm enough, or staying in a warm room. Try not to fidget with your pin curls too much if you can.
Step 5 - Now that your hair is air dried, you’ll want to slowly remove the clips and gently pull down on your pin curls until you get the intensity of curl you want. You can break up your curls by running your fingers through slowly. If it’s a special occasion and you’d like to add some heat, use a small barrel curling iron to add extra definition and perfection to some places. Finally, use a shine spray (but not too much or it’ll look oily), and enjoy rocking your natural locks!
Nutrition Advice for Healthy Curls
I spoke with my good friend and client Natasha Geddes, the founder of the Good Goddess and integrative nutritionist about best food practices for healthy hair.
“Whatever we put into our bodies is reflected into our skin and hair,” she said.
Her recommendations are to eat foods rich in vitamin a + e, good proteins, and foods with omega 3 fatty acids.
Next time you go grocery shopping, add these to your cart:
Lastly, get your hands on Powderful, a grass fed collagen created and carried by Green Goddess that’ll have your hair thanking you for it in no time!
]]>Stress gets the best of all of us sometimes, and having healthy ways to cope with it is imperative to maintaining our mental health.
There’s a lot going on in the world right now, so it’s no surprise if you’ve been feeling more anxious than usual.
It’s important to remember that you can’t do everything, but also that it’ll be easier to show up for yourself and others if you make intentional time for self care.
]]>Stress gets the best of all of us sometimes, and having healthy ways to cope with it is imperative to maintaining our mental health.
There’s a lot going on in the world right now, so it’s no surprise if you’ve been feeling more anxious than usual.
It’s important to remember that you can’t do everything, but also that it’ll be easier to show up for yourself and others if you make intentional time for self-care.
For this scalp massage, all you’ll need is your fingertips. If you want to add a little extra you can incorporate your fave smelling essential oils, set up the ambience with candles and music, or whatever else that allows you to feel calm.
If you’re noticing that your hair and scalp are looking and feeling a little dry these days, you can make this a moisturizing treatment as well by adding some oil to your fingers as you massage.
How to Self-Massage for the Scalp
Step 1 - Set up your surroundings so you feel calm and ready to focus on yourself. Add your essential oils to your palm and rub both hands together to warm up the oil. Bring your palms to your face and take a few nice, deep breaths.
Step 2 - If you’re using oil, you can add the oil from the bottle directly to your scalp in the dry spots that need it or onto the bristles of your brush, remember a little goes a long way! Start to brush through your hair to remove any tangles, (if your hair is very curly, you can omit this step), and then onto a paddle brush. These bristles will invigorate your scalp, apply medium pressure as you brush.
Step 3 - At this point, you can add more oil to your hands while we move through the first technique called ‘the scratch’. With quick-moving fingers, start to scratch your whole scalp as if you were removing a big itch. Try to ensure you are touching your whole scalp, from the hairline to the base of your neck.
Step 4 - Next, using both of your palms, rub your head in a circular movement. This is a great time to roll your head and neck, getting a nice stretch as well. You can do this for as long as you want.
Step 5 - Now, use your fingers to rake through your hair as if you were about to put it up into a ponytail. Starting at the front of your head, run your fingers back through your hair and squeeze at the end. Try dropping your head back at the end when you squeeze to release some neck tension
Step 6 - Spend some extra loving at the base of your neck by rubbing small, relaxing circles while maybe dropping one ear to one shoulder. Try also pulling upward and downward after your circles. Experiment with using one or both hands, as well as how much pressure you’d like.
Step 7 - Come back to raking the hair through your fingers, and then place your thumbs at your temples and your pointer fingers at the hairline, applying gentle pressure and making small circles.
Step 8 - To finish it off, use both palms to rub the hair back and any other last touches that feel good.
This is such a nice and quick way to relieve stress and connect back to your body. After your massage session, you might want to hop into the shower and shampoo the oil out of your hair and move on to a nice conditioning treatment. Remember, you deserve it!
Your favourite hairbrush is begging for a deep clean- and throwing it into the dishwasher isn’t an option to do that!
Like all of your other beauty tools, your hair brushes need to be cleaned. Over time they not only collect hair but also product residue and dead skin cells.
Without a good clean, you risk putting all of that junk right back onto your freshly washed hair. Let’s fix that!
]]>Like all of your other beauty tools, your hair brushes need to be cleaned. Over time they not only collect hair but also product residue and dead skin cells.
Without a good clean, you risk putting all of that junk right back onto your freshly washed hair. Let’s fix that!
The Only Tool You’ll Ever Need: A Brush Rake
There’s one tool that’s entered the market that has changed the game for hairdressers and expert hairstylists, and now we’re letting our clients in on the secret. A brush rake is a simple-to-use, easy-to-care-for, and incredibly effective way to clean all kinds of brushes, from round to paddle style.
You can see my go-to brush rake here and buy one for yourself to make maintenance a breeze.
Before the rake, the only option for attempting to clean a brush was using a wide tooth tail comb and going through the brush rows one at a time. Do you have the patience for that these days? Me neither. Not only is this method time-consuming and ineffective, but it also eventually ruins your comb. A brush rake was specially designed for this job and it’s good at doing it.
All you need to do is run the rake through your brush watch the hair and debris collect and then pull it off and toss it into the garbage! The rake works on all brushes made of all materials too.
If it’s been a long time since your brush has gotten a good clean, grab your brush rake and your fave shampoo and head over to the sink for a brush bath. Apply the shampoo onto your brush rake and then run some warm water over your rake and brush. Start to rake away, applying more water when needed for a brush that’s clean and good as new.
Not all of your brushes like to get wet through, so make sure you know if your brush can handle it before going for this deeper clean. If your brush base is made of rubber and has a hole, you’ll want to skip this and just use your rake dry instead.
I recommend giving your brush a rake after every use, that way it never gets too bad and bathing the brushes you can monthly!
For a video tutorial on brush raking, click here.
]]>Re-training your part may take a bit of time, from a few hours to a few days, so don’t worry if your part seems stubborn to stay at first. Have fun and play around with your new look for as long or as short a period of you like!
]]>
Changing up your look can sometimes feel like it requires something dramatic, like a radical cut or a major colour change, but applying expert techniques when it comes to a hair part has the potential to freshen up your entire face and satisfy that sense of newness you’ve been craving.
And the best part is, you can do it yourself for free without being locked into it if you change your mind.
FINDING YOUR FACE SHAPE
First things first, let’s look at how face shape plays a crucial role in determining what part will suit you best. To assess your face shape, part your hair down the centre and then pull the front strands out of your face with your hands or with a clip. Now you’ll be able to fully see the 3-quadrants of your face that’ll allow you to see its shape:
You can look at yourself in the mirror and take a rough estimation of what you see to find your face shape, pull out a tape measure for exact measurements, or look at a photo of yourself looking straight onto the camera. Keep in mind that in addition to the quadrants, you’ll also want to consider the width of your entire face. For example, if your forehead is bigger than your chin you might have a heart shaped face while an equal forehead and chin size will be more square. The length of your face can help you get more specific about your shape, like if you have an oval face or a round face, because oval is slightly longer than the other. Please know that every face shape imaginable is beautiful and that finding your shape is only a guideline in finding a part that works.
My recommendations for parts based on face shape are:
Here’s an expert tip you might not know about centre parts that I want to share. Because centre parts accentuate the centre of the face, they really suit symmetrical faces (but not everyone has one of those, right?) You can cheat the symmetry of your face by offsetting your part just slightly to create the illusion of a perfectly symmetrical face!
Side parts also have a trick that’s worth mentioning. Because hair grows in a circle, when you part your hair to the side, you’ll notice that one side will lay flat while the other has more of a lift and volume. Keep this in mind when choosing which side to part depending on what you’re into.
CHANGING YOUR PART
After you’ve figured out your face shape and played around with a part that suits and excites you, it’s time to make it stay put. So many people think that they have a natural and stubborn hair part that can’t change, but it’s actually very possible to take any parting out of your hair to try a different one.
Your best friend for retraining your part will be a spray bottle with water and your fingers!
Step 1: Use water to mist down your natural part
Step 2: Rub your fingers along the watered part to wake up the root of the hair so it’s easier to work with
Step 3: Place your part where you want it to be using a comb (MRB Ultimate comb for medium to fine density and MRB width tooth tail comb for high density hair)
Step 4: Spray a mist of water down the part and use your fingers to rub again
Step 5: Use a blow dryer and a brush to keep your new part in place
Re-training your part may take a bit of time, from a few hours to a few days, so don’t worry if your part seems stubborn to stay at first. Have fun and play around with your new look for as long or as short a period of you like!
]]>